

NetTeller Online Banking
With our free NetTeller Online Banking service, customers can manage their accounts from a computer, smartphone, or tablet 24/7. NetTeller allows customers to view account balances, transfer funds, reorder checks, access online BillPay, and set up email and text alerts to be notified of specific events.
{beginAccordion}
Enrolling in Online Banking Using Automated Online Enrollment
1. Go to our Bank’s website at myfccb.com
2. Click on Online Services.

3. In the dialogue box, click Enroll Now.
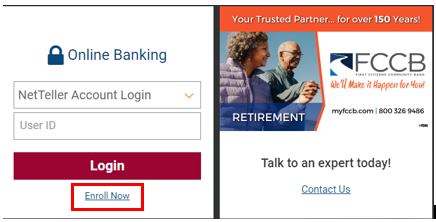
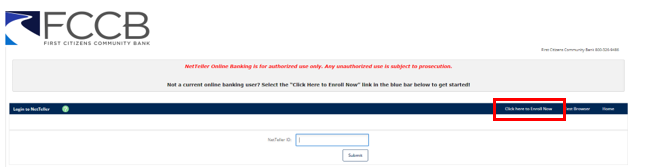
4. On the Login Screen, click on the Enroll Now hyperlink to begin the online self-enrollment process.
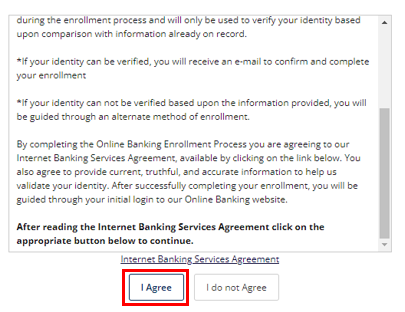
5. Read the terms and conditions, and select I Agree.
6. Enter your Tax ID Number, Account #, and email address. Click Continue.
7. Fill out your Name, Address, and DOB. Click Submit.
8. The information that you enter is compared to the information that we have on file for you. If everything matches, a screen appears where you will select Send Email Verification. If the information entered does not match, you will be presented with a message stating “Your enrollment for NetTeller cannot be completed at this time.” If you receive this message, please verify that the information that you entered is correct. If you continue to receive this message after multiple attempts, please contact us at 800-326-9486.*
9. Complete the steps described in the verification email received following an approved online enrollment request. This step must be completed from the same device that the enrollment process was submitted on.
10. You will have a one-hour time limit following the email notification to complete your online enrollment. If the link is not selected within the one-hour time frame, the online enrollment will expire, and a new request must be submitted.
*Note: If you already have an established NetTeller ID and you attempt to complete the online enrollment process, you will be unable to create another. Please contact us at 800-326-9486 for details.
Logging on to NetTeller Online Banking for the First Time
1. Go to our Bank’s website at myfccb.com
2. Click on Online Services.

3. Enter your logon credentials and follow the prompts. The initial password will be the last 4 digits of your Tax ID, and you will be prompted to change it upon successful login. Passwords must contain at least 1 number, 1 upper and lower case letter, may contain the following special characters +_%@!$*~, must be between 8 and 25 characters in length, must not match or contain your ID, and must not match one of your previous 4 passwords.
NetTeller Security Features
Our NetTeller system utilizes Multifactor Authentication (MFA) to automatically monitor accounts for unusual activity based on account history, and requires all users to verify their identities by answering pre-selected challenge questions if unusual activity is detected. Another security module that we use allows you to select a unique watermark from a library of images. This watermark is displayed upon log in to verify that you are on the correct website and have entered your correct NetTeller ID.
Both your security questions and watermark image are setup during your first log in.
Enabling Password Self-Reset
The password self-reset feature allows you to reset your password in the event you become locked out or cannot remember your password. Before you are able to use the password self-reset option, you must first login and enter information in the Password Reset Question and Password Reset Answer fields. These are located within the options tab under the modify personal settings section.
To utilize this feature after setup:
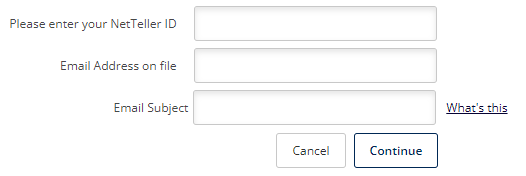
1. Select the Forgot Password link if you become locked out or cannot remember your password.

2. Enter your NetTeller ID number and email address. The email subject is required, and you can enter up to 50 characters.
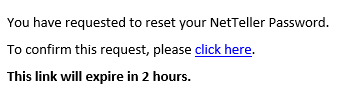
3. An email is sent with a Click Here function, which is valid for two hours from the time the email was originally sent. The date and time stamp are local time, and are determined by the device settings.
4. Select Click Here in the email. A secure internet browser screen appears.
5. Enter your NetTeller ID and the answer to your security question established on the Options menu, and then select Continue.
6. Create your new password following the requirements on the screen, and then select Submit.
7. You may now log on using your new password.
How to Contact Us
Via NetTeller Secure Message Center
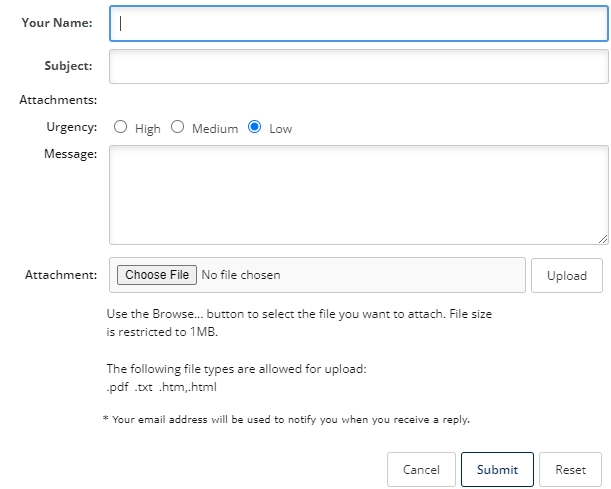
To access the Message Center, log into NetTeller and click on Contact in the upper right-hand corner.
Use this message center to view, reply to, create, and delete secure email messages with or without attachments between the financial institution and the user. Summary information for email messages appears on the Message Center submenu.
To send a message Click New.
Complete the form and click Submit to send it.
Or By Phone
For help with all of your banking needs, you can reach our Customer Services & Solutions Center at 800-326-9486 M-F from 8:00 – 5:00 and Saturdays from 8:30 – 12:30.
Small Business Cash Management customers can contact our Electronic Banking Department directly at 888-741-9531 for assistance with ACH, Remote Deposit, Positive Pay, and Wires.
{endAccordion}
Navigating Your New NetTeller
{beginAccordion}
My NetTeller
Use this submenu to customize the launch page screen. If My NetTeller is enabled, you can then customize the available NetTeller widgets. You can view summary information and add shortcuts to various NetTeller features (e.g., alerts, messages, and accounts).
Click Configure This Page to customize your home screen.
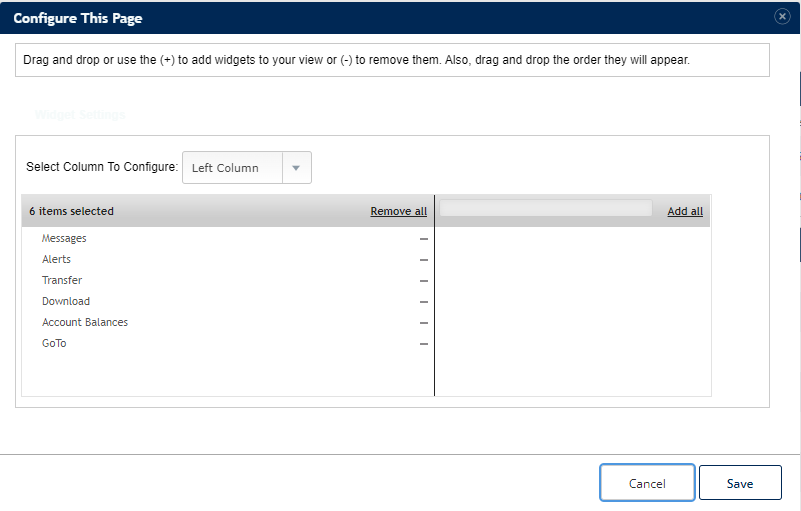
Select the Set As Start Page to make this screen your default screen following logon.
Accounts
Use this submenu to view all accounts within NetTeller. If there are new alerts on an account, a link to the alerts appears above the accounts. Select the link to view the specific login alerts.
The Select Option drop?down list displays available quick links to other screens:

- Transactions – Select to view the NetTeller > Transactions > Current Transactions screen
- Download – Select to view the NetTeller > Transactions > Download screen.
- Statements – Select to view the NetTeller > Statements screen.
- Stop Payments – Select to view the NetTeller > Stop Payments > New screen.
- Transfers – Select to view the NetTeller > Transfers > Pending screen.
- Account Info – Select to view the NetTeller > Account info screen.
Transactions
![]()
Use this submenu to view or download transactions, and view transaction history, available balance information, and both pending and posted ACH transactions.
Viewing Current Transactions
Use the Current Transactions submenu to view a list of all account transactions for the selected accounts.
- Go to NetTeller > Transactions > Current Transactions.
- Select an account for View Transactions For.
Select View Image to view the corresponding images. Select Rotate to rotate the image.
Downloading Transactions
You can download transactions from accounts and import them into various software packages based on available formats.
![]()
- Go to NetTeller > Transactions > Download.
- Complete the fields.

Selected fields are defined in the following list
Select Download Range
- Since Last Download – This option downloads transactions posted since your last download.
- Since Last Statement – This option downloads transactions posted since the last statement
date. - Date Range – This option is limited to the previous 6 months.
Select Download Format
Select the desired software format into which you want to import the transactions. Available formats may include:
- Microsoft money (OFX)
- Quicken (GFX)
- Intuit QuickBooks (QBO)
- Personal Finance (QIF)
- Spreadsheet (CSV)
- Word Processing (TXT)
Searching for Transactions
![]()
1. Go to NetTeller > Transactions > Search.
2. Select an account in Search Transactions For.
3. Complete the fields, and click Search.
![]()
By Date
Select a date range to narrow search results
By Amount
Enter a beginning and ending amount.
By Check Number
Enter a maximum of 11 numbers into Start and End.
View
Select an option from the drop?down menu to narrow search results.
Include Checks
Select this check box to display transactions with checks in the search results.
Include Electronic Transactions
Select this check box to display electronic transactions in search results.
Transfer
![]()
Use this submenu to manage funds transfers. You can make transfers between any transaction accounts based on the authority levels allowed.
Automatic fund transfers are not permitted for certain account types.
Scheduling Transfers
1. Go to NetTeller > Transfers > New.
2. Complete the fields. Click Submit.
![]()
Selected fields are defined in the following list.
Transfer Funds
Select an internal account. The available funds appear if an internal account is selected.
Transfer Funds to
Select an account filtered from the full internal list of available accounts. The available funds appear if a DDA account (checking or savings) is selected. The current balance appears if a non?DDA account (i.e., any account type other than checking or savings) is selected.
Payment Options
Select one of the following options for loan accounts to apply the payment to the loan as designated in the loan parameters or override and specify distribution of the payment:
- Make Regular Payment to Loan
- Only Apply Payment to Principal
- Only Apply Payment to Interest
Transfer Amount
Enter the desired amount for the transfer. The amount cannot exceed the available funds amount that appears next to the Transfer Funds From field. The amount also cannot exceed the daily limit established during setup.
Frequency
- Selected One Time (default with current date) to schedule a one?time only transfer
- Select Weekly to schedule a funds transfer to occur each week on a specified day of the week
- Select Bi Weekly to schedule a funds transfer to occur on a biweekly basis on a specified day of
the week. The Start Date must be a day that is equal to the Week Day selected. - Select Semi Monthly to schedule a funds transfer to occur on specified dates in a month, such as
the 1st and 15th of each month. - Select Monthly to schedule a funds transfer to occur on a specified date of the month, such as
the first of the month.
Transfer Memo
Add a memo to the transfer, if desired.
Managing Transfers
- Go to NetTeller > Transfers > Pending
- Choose a situation and follow the corresponding steps.
Viewing Transfers
- In the Transfer Options column, next to the desired transfer, select View.
Editing Transfers
- In the Transfer Options column, next to the desired transfer, select Edit.
- Edit the fields, as necessary.
- Select Submit.
Deleting Transfers
- Choose one of the following options:
-
- In the Quick Delete column, select the check box next to the desired transfers, and then select Delete Selected.
- In the Transfer Options column, next to the desired transfer, select Delete.
Viewing Transfer History
![]()
View scheduled one?time and recurring funds transfers for a selected account.
- Go to NetTeller > Transfers > History
- 2. Choose one of the following options:
- Select an account to view history for that specific account
- Select Details next to a particular transfer to view details for that transfer.
- Select Search to filter your results.
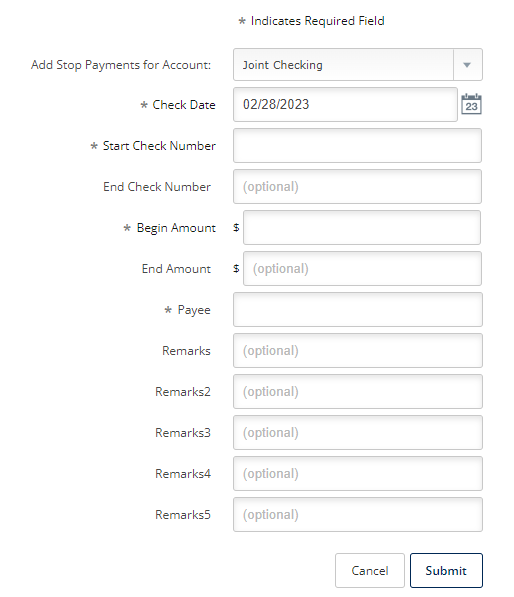
Stop Payments
Use this submenu to create new or view stop payments entered in NetTeller.

Adding Stop Payments
1. Go to NetTeller > Stop Payments > New
2. Complete the fields. Click Submit.
Viewing Stop Payments
- Go to NetTeller > Stop Payments > Current.
- Select View next to the desired payment.
Editing Personal Settings
- Go to Options > Personal.
- Editable fields include email address, mobile phone number, NetTeller ID, and password. Make changes as necessary.
- Select Submit.
Editing Account Pseudo Names
The account pseudo name that appears in NetTeller for the associated account can be modified. When the account pseudo name is modified for an account that has a recurring (scheduled) or pending transfer, the transfer is deleted.
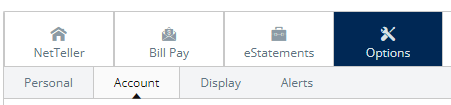
- Go to Options > Account.
- Select an account type.
- In the Account Pseudo Names column, drag and drop the accounts to rearrange the display
order. - In the New Account Pseudo Names column, edit the descriptions.
- Select Submit.
Establishing Display Defaults
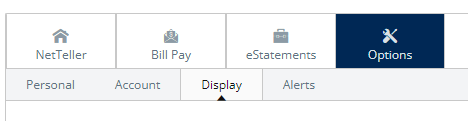
Use the Display submenu to customize how your NetTeller data appears.
- Go to Options > Display.
Selected fields are defined in the following list.
Accounts
Select how many accounts show in My NetTeller by default.
Transactions
Select your default number of transactions.
Download Lines
Determine the number of transaction description lines that should be include when downloading transactions via Transactions > Download:
- One Line
- Two Lines
- Three Lines
- All Lines
Transfer Confirmation
- Select Yes to enable the transfer confirmation that appears after you enter and submit transfer information. Confirm the transfer before receiving a confirmation number.
- Select No to disable the transfer confirmation. After you enter and submit the transfer information, the confirmation number appears instead of asking for a transfer confirmation.
Alerts
Use this submenu to view all established alerts for your profile.
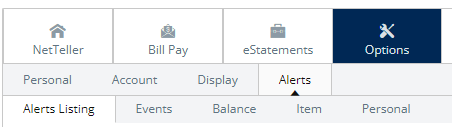
Available alerts on the Alerts Listing submenu include:
- Current Even Alerts – Set up the items or watches that trigger alerts. Select event alerts to be sent to Cash Management and other online users when specific transactions, such as wire transmissions, ACH EDI transactions, and ACH batches are initiated through NetTeller.
- Current Balance Alerts – Set up an alert to be notified when a balance is above or below a set amount.
- Current Item Alerts – Set up an alert for a specific date or create a personalized alert message.
The four alert types appear as sub options.
Event
Event alerts: generate when a specified activity occurs, apply to all accounts linked to your Online Banking, remain in effect until they are deselected. Specified account activity triggers the alert. To enable event alerts, select one or more delivery options from the Alert Type column next to the desired alert’s name.
Balance
Balance alerts: generate when your account balance is above or below a specified amount, apply to only selected accounts, and remain in effect until they are deselected. To enable a balance alert, choose a delivery option, the desired account, the condition (above or below), and the target balance.
Item
Item alerts: generate when a specified check clears, and apply to only selected accounts TO enable item alerts, choose a delivery option, check number, and the desired account.
Personal
Personal alerts: generate on a specified date, and contain free?form text. To enable a personal alert, choose a delivery method, a date to receive the alert, and enter a message for the alert.
If you select the Email delivery method, then you may be asked to confirm your email address.
If you select the Text delivery method, then you many be asked to confirm your phone number and carrier.
Tip: if you are using text alerts and you do not know your carrier’s address, then send a text message to your email address. Once you receive the email, the From field shows the correct carrier address for your phone.
{endAccordion}